- HubPages»
- Arts and Design»
- Photography»
- Photography Instruction & How-Tos
The Secrets of Being a ShutterStock Contributor
Photographer on the Side
A Subscriber turned Contributor
Although there are several different opinions about micro stock photography, I have found it to be a nice addition to my monthly income. I have tested out quite a few different stock sites as a contributor and I have found that ShutterStock is one of my biggest moneymakers. I won’t lie; I was turned down twice before I was accepted as a contributor, even though I was a contributor on other sites. Now that I have more experience with the site, I realize that the difficult approval process on both being accepted and uploading photos is really what brings in the revenue for the contributors.
Although I have always taken photos, I never worked as a photographer more than on the side or for specific projects for my work. I actually started on the graphic designer side. I would sift through images over and over looking for a specific niche of photos and never finding them. I would sit there and complain that the person in the photo had their forehead cut off, or that the white isolation was so messy I had to do another hour of processing to get what I needed. I then decided to join a few stock photography sites and see what I could find out. This was about 5 years ago. What I found out was that several sites were allowing any and all images to be uploaded because the goal was the only feed the beast, not to offer quality images that designers need. I was able to upload as many images that I wanted, but I wasn’t getting the image downloads to make it worth my time.
Learning Your Camera
I took about a year off from it, and then decided to revisit the sites. This time I did a little reading and decided to put all of my efforts toward joining and creating a portfolio on ShutterStock.com. They require that you submit 10 photos for review, and it is a must that 7 out of 10 images pass their approval process. The first time I submitted my first 10 I chose images that I had submitted to other sites. I did not make the cut, and the reviews seemed pretty harsh to me. I then had to wait 30 days and resubmit different photos. This time I was just 1 photo off from passing, but again I failed and had to wait another 30 days. For my third attempt I took a different approach. I visited the forums where you could find information from people that were already successful on the site. I read through so many critiques that I started to be able to find the things that were “wrong” with a photo before reading the comments. After doing this for the full 30 days I needed to wait; I resubmitted a completely new batch of photos shot specifically for ShutterStock. Finally, I was successful and I was accepted as a contributor on ShutterStock.
What is Tack Sharp?
The tips I’m going to mention are tips that I read I don’t know how many times and thought, “well that’s obvious”. But as I learned, it’s more than just making an image sharp. And even what you may think is sharp, you may find out is really not sharp at all according to ShutterStock standards.
Let’s start with checking to make sure an image is “tack sharp”. I have opened photos and thought, wow, I would totally download that and use that. And then I looked at the image at 100 percent and realized that the image was not even close to being sharp.
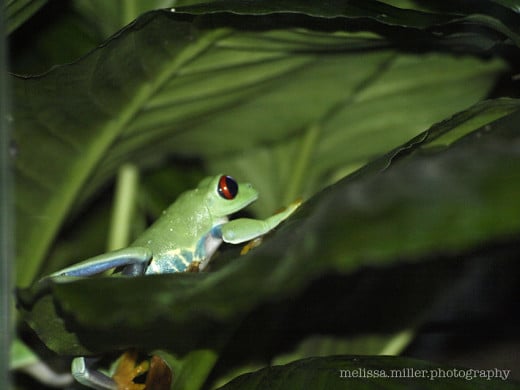
Here is a good example of how a photo can trick you into thinking it is sharp enough for stock photography. You will notice that when the image is open showing the entire image, it seems pretty sharp. This is one of the things that I was lacking the first two times I attempted to get accepted. I looked at the image as a whole, not at 100%. The reason they do this is so that they can sell it at the largest size possible. They gauge this on the size of your image, not the size that the image looks best. So if you image at 100% is not tack sharp, they are unable to sell it at that size. Even if they were to sell it at the size that it looked best; it most cases the image would not be large enough to qualify.
Looking at a photo at 100%
The 100% View for Tack Sharp Images
You will see in the critique forums that they require people to show the image as well as a 100% crop. This is what I have done here with this tree frog. When a reviewer looks at you image, this is one of the first things they will look at. They will blow it up to 100% and look at the quality. This photo would be denied.
Image is Blurry at 100%

Example of Possible Submission
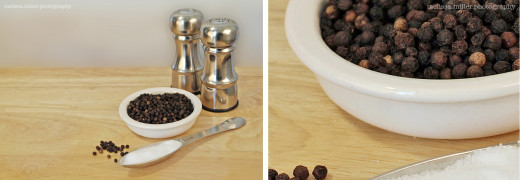
Here is an image that has a better chance of passing the approval process in terms of being sharp.
Possible Submission
How To Find Commercial Value Photo Opportunities
Look Through Successful Contributions
The best way to get used to taking images with commercial value is to look through the images that have already been approved. Don’t copy them obviously, but take notes on the angles they chose, the lighting and the food itself. Search for something particular and take note on which photographs stand out to you. Try to figure out why those images stand out to you more than the others. Strive to have that same effect with your photos.
You will also notice when people in the forums mention a snapshot versus a professional stock image. I can take a million photos of my pup that I love, but others may not consider more than a snap shop. As an editor or publisher of a publication would you opt to put a snapshot of your neighbors pup on the cover, or would to lean more towards a professional shot with a white isolation as the non-distracting background. Those images make more of an impact, and publishers are looking for more impact to get more readers. Take yourself out of the photographers shoes, and really ask yourself as you are looking at your images “would I pay money for this, and would I use this for a project?”
Commecial Value
Another comment you will see on a regular basis is whether the image has commercial value (CV). This is something that comes easily to me because for over 10 years I searched for specific images that I needed to create projects including magazine covers. For others that don’t work in the same field, this can be frustrating. When designing a cover, for example for a dining guide, I look for food shots. When I’m looking through the food shots I’m looking for something that will catch the eye of the passerby or make someone hungry enough to want to sift through and look for a restaurant in the publication. The image needs to create an emotion that will become an action. In addition to that, I am looking for images that will be generic enough to be an umbrella for all of the restaurants within the guide. I also look for the angle that the image is taken, for example, I rarely every use an image that has been taken straight on and above the plate. I want the image to have the same angle as what you would see when you sit down to the table. I need for people to look at the image on the cover, and envision themselves eating out at a restaurant.
Lighting is Key
Your image could be tack sharp, have a ton of commercial value, but still be denied approval because of lighting. Lighting is such an important factor in photography that most people don’t take the time to learn. If you are taking images outside, remember to keep an eye on where the sun is, and what highlights that sun has the potential of blowing out. Think about where the sun is just as you would in studio lighting. Try to get lighting that is even as possible, and ALWAYS keep your ISO as low as possible to reduce the effects from a higher ISO. When you are using indoor studio lighting, keep in mind the hard shadows and the uneven background. If the shadow under the strawberry is the focal point, the shadow is way to dark. Work with your lighting and different background techniques to make the shadow more subtle. If the image looks poorly lit, it will most likely not pass approval.
Good Images Equal More Money For Contributors
And please keep this in mind: when your images go through the approval process, the moderators are not thinking about your portfolio. They are thinking about the users that pay money to download these images. If there are only quality images available, more users was pay money to subscribe or download the images. The more people downloading – the more money for the contributors.
Be sure to take a look at the images that have made the cut, and look at the top 100 images downloaded. Don’t be irritated if you submit images of flowers and they don’t get approved. If you do a search for “flower” you will notice thousands of photos appear. Even if your image did get approved, it would be buried and most likely not seen. Focus on things they need, or that users are requesting.
Feed The Beast
Feeding the beast is a definite must for this site because the do offer their customers an amazing amount of images. Feeding the beast with quality images that have commercial value will earn you money. Remember that holidays happen months before the actual holiday in the stock photography world. If it is Christmas time, think about uploading your valentine’s images. Most people use these for some sort of advertisement that is anticipating a holiday, so they are downloading these images months in advance. That doesn’t mean you can’t shoot Christmas images while your décor is out for the season, it just means keep them in a safe place and upload them in September for the next Christmas holiday.
If you are not sure about an image, visit the forums. They may be harsh and they definitely will not hold your hand or sugar coat the truth, but they will teach you how to become a great stock photography. It will save you time and frustration in the end if you learn what the stock photography sites want.
Last but not least, you need to have a passion for this type of photography. This isn’t easy money that will just fall into your lap when you take a photo of your plate of food. It takes a lot of proactive, tons of denials, a daily dose of education (at least) and a lot of patience. If you start out and really don’t like it, don’t do it. You need to enjoy it, love it and really do this on a regular basis to make any money.
So, are you ready to start contributing your photography and making money? Click here to sign up!
Other Great Photography Articles
A Photographers Review: Olympus Zuiko 70-300mm f/4.0-5.6 ED Lens
A review of the Olympus Zuiko 70-300mm lens from the perspective of a photographer. This article includes photographs taken by the author that highlight different lighting situations that you may use this lens, different obstacles you may run into, and some great examples of what you could do with this lens. This is a budget friendly lens that is great for beginners and intermediate photographers.
How To Overlay Text On Photos in Adobe Photoshop
An easy technique in Adobe Photoshop to overlay text on a photo of your choice. This tutorial shows you how to use the eye dropper tool and change the opacity of the text.
How To Make A Feathered Border in Adobe Photoshop
A quick and easy tutorial on how to get that soft feathered border around image. Sometimes this is all you need to make a good photograph a great photograph.
How to Pull Out Specific Colors in Photographs Using Adobe Photoshop
A quick and simple way to pull out specific colors in the photograph while keeping the rest of the photo black and white. Using all versions of Adobe Photoshop including Adobe Photoshop Elements, photographers can easily create beautiful images but highlighting specific colors.
How to Remove The Yellow Tint in a Picture
How to remove the yellow tint in pictures created by fluorescent lighting. This tutorial shows step by step instructions and screenshots using Adobe Photoshop CS4.


