- HubPages»
- Arts and Design»
- Photography»
- Digital Photography
How To Create A Foggy Haze on Photos

Tone Down The Saturation

Tools of the Trade
![Adobe Photoshop Elements 2018 [Old Version]](https://m.media-amazon.com/images/I/51AQ4wl7eOL._SL160_.jpg)
How did you do that?!
It seems that whenever I do photo edits in Adobe Photoshop on the fly, I always get asked the question “how did you do that?” Now, let’s face it; if I were to come back with ‘I just hit a bunch of buttons randomly and it happened’, I would sound like quite a jerk. But, there are times that we photographers really can’t explain the process because we just went with the Photoshop flow. Even if we could explain it, it would take an hour just to explain all of the steps, and shortcuts and actions we created to get to the image they are admiring. This is where this hub comes from; can I edit a photo on the fly and go back and explain how I got to the end result? The answer is yes!
My goal was to create a visual from an existing photograph that was light and gentle and could be used behind text without taking away from the message. I wanted the image to still be a key component, so I didn’t want to just lighten the image, or blur it into the background; I just wanted to make it a bit less abrasive. Here is what I ended up with after I edited the photo in Adobe Photoshop.
You can turn a boring photo into an interesting photo

Want to use my photo for the tutorial? Send me a request!
The image of the flower is still crisp and clean, but less abrasive with less color saturation. The lighting added to the image looks like the sun is kissing the subject and the bit of fake fog makes the lightened flower still stand out against the background. Ok, great. Now, How did I do that? Let’s get started!
Once you choose the image that you want to use, open it in Adobe Photoshop. If you would like to use this image to work along with the tutorial, head on over to my page and drop me a request. I don’t mind at all!
Adjusting Saturation and Hue

Photo Software
Do you use Adobe Photoshop or Adobe Lightroom to edit your photos?
Don't be afraid to play in Adobe Photoshop
Once you have your photograph open on your screen. Go to Image -> Adjustments and then choose Hue/Saturation. This will give you a screen with a variety of options to play with.
The tools are automatically set to zero

Be One With Photoshop
Go ahead, don’t be scared. Move those sliders and get a feel for what they do and how your image changes when you use them.
Change Your Saturation

If you are curious, try it. There is always 'undo'
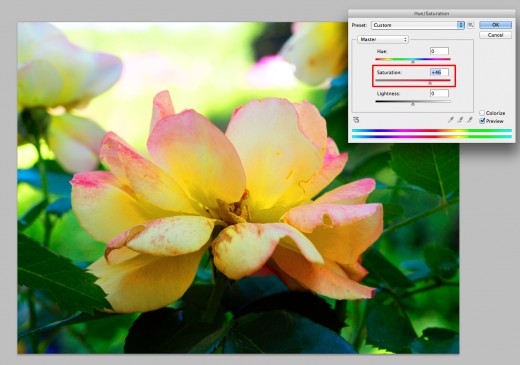
For this particular image I am going to reduce the saturation to -46. This reduces the color saturation; it doesn’t necessarily lighten the image although it may look like it does. Wondering what happens if you increase the saturation +46? Here it is:
Whoa! That's bright!
Now, try changing the lightness bar
Whoa! Where are my sunglasses? Ok, that was bright! Let’s take a quick peek at what happens when we increase or decrease the lightness of the image:
Decreasing Lightness Will Make The Image Darker

And if we increase the lightness...
As you can see, it treats the image with a darker exposure, which in turn looks like it has darkened the entire image. This is also called underexposed and can be easily fixed in Adobe Photoshop if it happens straight out of the camera. On the flipside, take a look at what happens when I increase the lightness of the image:
And this would be overexposed...
 was over exposed to the light")
Range of hues
This is what we call overexposed and although it is more difficult to fix straight out of the camera; this particular image is fairly simple because the white highlights are not blown out. But, we will save that for another article.
And finally, let’s take a look at what changing the hue does for the image. Since there are so many things you can do with this tool, below is a video showing you the range of hues that you can use when editing photos.
See the wide range of hues
Now... back to the tutorial
Now, let’s get back to your original image with the -46 saturation in place and get back to this tutorial! The next step we are going to take is going to utilize your adjustments using a mask. What is a mask you ask? Good question! It over lays your changes in a new layer, and from there you can control where, how much and when the adjustment is made to your image. This is best used to utilize the adjustment on a background or foreground and not the opposite, which is what we are going to do now.
Exposure Mask

You can see the exposure layer now

Now you are ready to edit your edits
In your pallets choose the exposure button (it looks like a half black and half white square with a plus and a minus sign). Change your offset to .2120 and make sure your gamma is set at 1. You will notice that your image gets a bit of a haze over it. We want to keep that haze in the back, but we don’t want quite so much on the flower. This method works really well for photos of people with a short depth of field. Add a little haze to an already blurred background and you have yourself an incredibly interesting image! Where did that person come from? Why is it foggy behind him? Why is he so calm when we can’t see into the fog? What does he know that we don’t? Yea, this is a great tool for portraits.
Control your brushes and opacity

Now play!
Now that you have a mask over the image, you will use your eraser tool to reduce the amount of adjustment. You can control the size of the brush you use, the feather of the brush and even the opacity of the brush. I wanted a nice gentle transition of the adjustment, so I chose a very soft brush at 61% opacity. From there I erased the mask that was over the main flower subject.
Give the image a natural anchor point when editing

Flatten your Image Into One Layer Again

Flatten it back into one image layer
Next, you want to flatten the image. This combines all of your layers so any changes that you make will take effect on the entire image; not just that single layer.
Add Lighting Effects

Amp Up That Lighting
The next step is to amp up the lighting to give it more of a direction and give the image more depth. Go to Filter -> Render and then choose Lighting Effects. I expanded the light source and moved it so it was lighter at the top right corner and darker in the bottom left corner. You can choose to do what makes sense to you, but be sure that the light can enter somewhere within the image frame. This will give the image a sense of motion such as the sunlight streaming in a window.
Lighten the Image Using Curves

Take that contrast out
The lighting left the image a bit too contrasted, so the quickest and easiest fix is to adjust the curves. This is where you can control how light or dark the image is by using levels of light within the image. Choosing the pull the curve line from the center will increase the lightness of the entire image, where pulling from a bit higher or lowers will affect a select portion of the image.
Use The Sharpen Tool Sparingly

Don't Forget To Back Up Your Photos

Sharpen. With. Care.
Since we are for the most part finished with the adjustments, the next thing is doing an overall sharpen for your image. Sometimes your image will need it, while other times it will make it look too processed. Keep a close eye on how much you sharpen an image as it will look fake and unnatural. Go to Filter -> Sharpen and then choose Unsharpen Mask. I used quite a bit more than I even do on a photo, but that is the look I was attempting to accomplish.
Adding Warmth

Warm Tones
Finally, I want to add a warm tone to the image so that viewers get a sense of a warm summer day. To do this, we can simply add a photo filter and overlay it at a light opacity. Go to Image -> Adjustments and then choose photo filter.
Add The Warming Filter

And you are done!
By choosing the warming filter you will successfully give it a much warmer tone with dark oranges in the tones. For this image I used Warming Filter (85) at 17%.
Then I put my watermark on the image and it was ready for sharing, as well as this tutorial with you!
Before Editing

After Photo Edits

Other Adobe Photoshop Hubs:
How to remove the yellow tint from an image in Adobe Photoshop
Sometime fluorescent lights throw off an ugly yellow haze even if you have your white balance set correctly in your camera. Learn a quick and easy way to remove the yellow from your images.
Learn how to pull out specific colors in Adobe Photoshop
Want to keep an apple red, but change the rest of the image to black and white? Easy instructions how to do this to your own photos!
Overlaying Text in Adobe Photoshop
Want to add some inspirational quotes to your images or even type a watermark onto your photographs? Learn how to quickly overlay text on your images in this hub!
How to Create Your Own Action in Adobe Photoshop
Sometimes, you figure our a method of processing images, and you want to say what you did for batch processing. Don't worry; you can accomplish this by creating and utilizing Adobe Photoshop Actions.
Adobe Photoshop For Beginners: Part 1
Looking to dive in and learn the basics of Adobe Photoshop? This hub includes examples images and screenshots to walk you through learning the basics of the daunting software.


